This guide provides detailed steps for installing the Honeywell TH8321WF1001 thermostat‚ ensuring a smooth setup process.
It covers essential configurations for optimal performance and energy efficiency.
Designed for both residential and commercial use‚ this manual helps users navigate wiring‚ Wi-Fi setup‚ and advanced features effortlessly.
Follow the instructions carefully for a seamless installation experience.
Overview of the Honeywell TH8321WF1001 Thermostat
The Honeywell TH8321WF1001 is a Wi-Fi-enabled‚ touchscreen thermostat designed for smart home integration.
It features a high-resolution display and intuitive interface for easy temperature control.
With geofencing and voice command compatibility‚ it offers advanced convenience and energy savings.
Compatible with most HVAC systems‚ it supports heating‚ cooling‚ and heat pump configurations.
The thermostat also integrates seamlessly with the Honeywell Home app‚ allowing remote monitoring and adjustments.
Its sleek design and robust functionality make it a versatile choice for modern homes and businesses.
Importance of Following the Installation Manual
Following the Honeywell TH8321WF1001 installation manual is crucial for ensuring safe and proper setup.
It provides step-by-step guidance to avoid errors that could damage the system or void the warranty.
Incorrect installation can lead to safety hazards‚ inefficient performance‚ or even system failure.
By adhering to the manual‚ users can ensure compatibility with their HVAC system and optimize energy efficiency.
Additionally‚ proper installation guarantees compliance with manufacturer specifications‚ maintaining the thermostat’s advanced features and reliability.
Always refer to the official guide for accurate and secure installation procedures.
Key Features of the Honeywell TH8321WF1001
The Honeywell TH8321WF1001 is a Wi-Fi-enabled thermostat offering advanced home comfort control.
It features a high-resolution touchscreen display for easy navigation and programming.
With geofencing technology‚ it optimizes heating and cooling based on your location.
The thermostat supports voice control through smart home systems like Amazon Alexa.
It also includes energy-saving modes and detailed usage reports to enhance efficiency.
Compatibility with multiple HVAC systems ensures versatility‚ while its sleek design complements any home decor.
These features make it a top choice for modern‚ connected living spaces.

System Compatibility and Requirements
Ensure your HVAC system is compatible with the Honeywell TH8321WF1001.
Check voltage requirements and wiring configurations to avoid installation issues.
Compatibility with heat pumps and dual-fuel systems is supported.
Checking System Compatibility for Installation
Before installing the Honeywell TH8321WF1001‚ verify system compatibility;
Ensure your HVAC system supports the thermostat’s voltage and wiring requirements.
Check if your system is compatible with heat pumps or dual-fuel setups.
Refer to the manual for specific compatibility guidelines to avoid installation issues.
Proper system alignment ensures optimal performance and functionality.
Understanding the System Requirements
The Honeywell TH8321WF1001 requires a 24V HVAC system with a common wire (C-wire).
It supports gas‚ electric‚ and heat pump systems‚ including dual-fuel setups.
Ensure your system matches the thermostat’s compatibility for proper functionality.
The manual provides detailed requirements for wiring‚ voltage‚ and HVAC types.
Verify these specifications before proceeding with installation to ensure seamless operation.
Ensuring Proper Wiring and Voltage Compatibility
Proper wiring is crucial for the Honeywell TH8321WF1001 thermostat.
It requires a 24VAC power supply and a common wire (C-wire).
Verify your system’s wiring configuration matches the thermostat’s terminals (R‚ W‚ Y‚ G‚ C‚ etc.).
Ensure the voltage does not exceed 30VAC to avoid damage.
Use the manual’s wiring diagram to connect terminals accurately.
Incorrect wiring can lead to malfunctions or safety hazards.
Double-check connections before powering up the system for optimal performance and safety.
Installation Steps for the Honeywell TH8321WF1001
Begin by turning off power to the HVAC system.
Remove the old thermostat and disconnect wiring.
Mount the new thermostat base securely.
Connect wires to the appropriate terminals.
Reattach the thermostat faceplate.
Restore power and test functionality.
Follow the manual for precise wiring and setup instructions.
Pre-Installation Checklist
- Turn off power to the HVAC system at the circuit breaker or fuse box.
- Confirm compatibility with your heating and cooling system using the manual.
- Gather necessary tools: screwdrivers‚ wire strippers‚ and a level.
- Ensure all wires are labeled correctly before disconnecting the old thermostat.
- Verify the voltage requirements match your system (24V AC).
- Clean the wall area and cover any marks left by the previous thermostat.
- Have the Honeywell TH8321WF1001 installation manual readily available.
These steps ensure a safe and efficient installation process. Refer to the manual for system-specific instructions.
Removing the Old Thermostat
- Switch off the power to the HVAC system at the circuit breaker or fuse box to ensure safety.
- Gently pull the old thermostat away from the wall to access the wiring.
- Label each wire with its corresponding terminal (e.g.‚ R‚ W‚ Y‚ G‚ C) for easy identification during reinstallation.
- Carefully remove the screws holding the old thermostat in place and set it aside.
- Inspect the wiring for any damage or corrosion and repair if necessary.
Consult the Honeywell TH8321WF1001 manual for specific instructions‚ especially for complex or unique systems. This step ensures a smooth transition to the new thermostat.
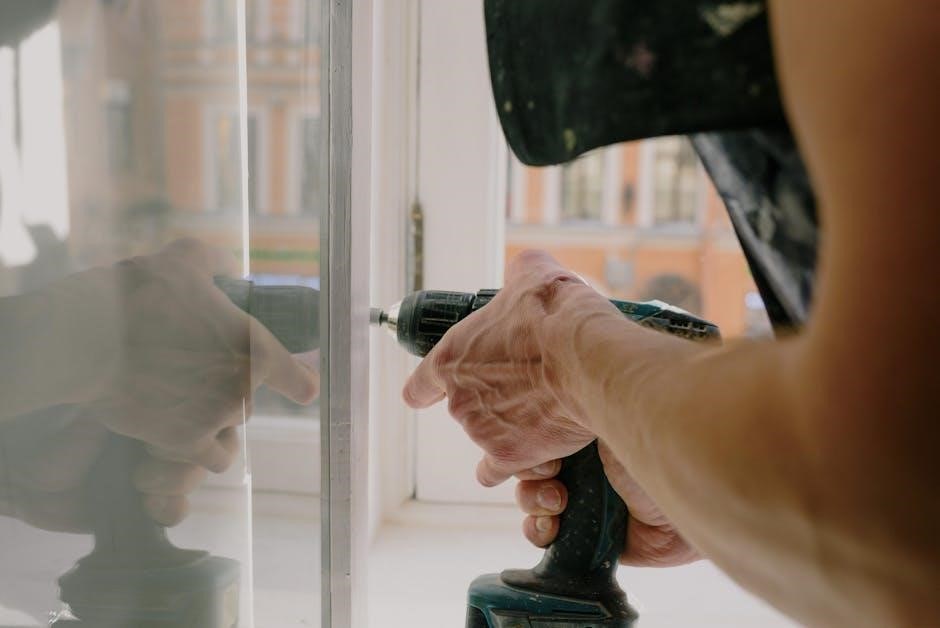
Installing the New Thermostat
- Unpack the Honeywell TH8321WF1001 thermostat and ensure all components are included.
- Mount the thermostat base to the wall using the provided screws and wall anchors.
- Align the base level and secure it firmly to the wall.
- Connect the wires to the appropriate terminals (e.g.‚ R‚ W‚ Y‚ G‚ C) as labeled during removal.
- Tighten all wire connections to ensure proper conductivity.
- Attach the thermostat faceplate to the base and ensure it clicks securely into place.
Refer to the Honeywell TH8321WF1001 manual for specific wiring diagrams and configurations. Proper installation ensures safety and optimal performance.
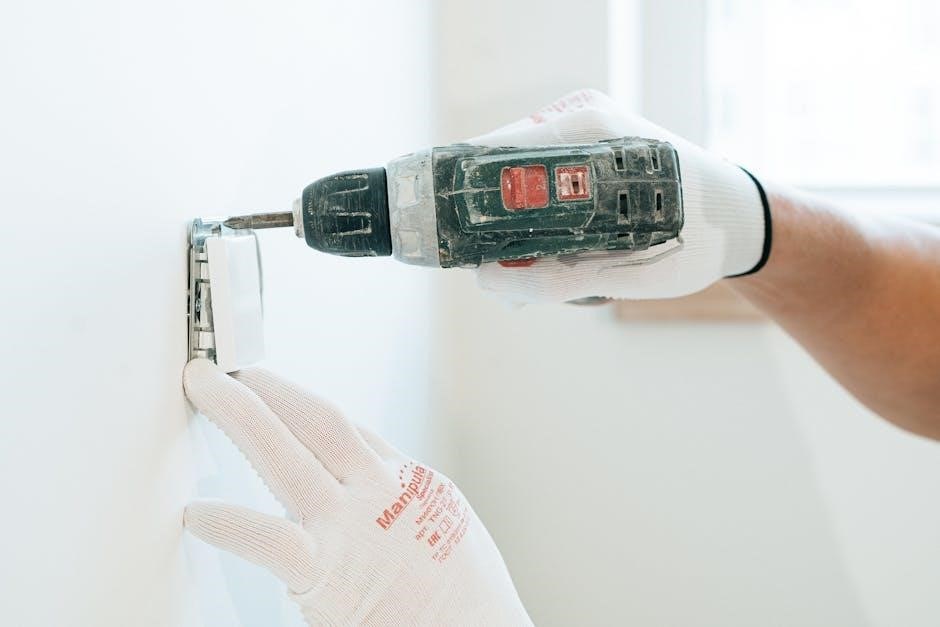
Connecting the Wiring to the Thermostat
Ensure the power to your HVAC system is turned off before connecting wires to the Honeywell TH8321WF1001 thermostat.
Match each wire from your previous thermostat to the corresponding terminal on the new device.
Use the wiring diagram provided in the manual to verify correct connections.
Tighten all wire connections securely to prevent loose wiring.
Double-check that all terminals are properly aligned and seated;
Refer to the manual for specific terminal labels and configurations.
Power on the system and test functionality to ensure correct wiring.
Configuring the Thermostat
Access the Installer Setup by entering the password‚ typically the product’s date code.
Configure Wi-Fi settings to connect to your network.
Set temperature schedules and preferences for optimal comfort and energy savings.
Setting Up Installer Options
Access the Installer Setup menu by selecting “Installer Options” from the touch menu.
Enter the password‚ typically the product’s date code‚ to proceed.
Configure essential settings such as heating type (gas‚ electric‚ or heat pump) and fan operation.
Set the changeover valve for heat pumps and enable advanced features like geofencing.
Ensure all settings align with your HVAC system.
Save changes to apply configurations.
Test the system afterward to confirm proper functionality.
Configuring Wi-Fi and Network Settings
To connect your Honeywell TH8321WF1001 thermostat to Wi-Fi‚ navigate to the network settings menu.
Select your home network from the available options and enter the password.
Once connected‚ ensure the thermostat is linked to your Honeywell Home app for remote control.
Verify internet connectivity to enable features like remote access and smart home integration.
Test the connection by checking for firmware updates or syncing schedules.
A stable network connection is crucial for optimal performance and smart functionality.
Setting Up Initial Temperature and Schedules
After installation‚ set your preferred temperature range using the thermostat’s interface.
Choose a default temperature for both heating and cooling modes.
Next‚ create a daily schedule by selecting specific times and temperatures.
Use the touchscreen to program different settings for weekdays and weekends.
Ensure the schedule aligns with your lifestyle for energy efficiency.
Save your settings to activate the schedule.
You can also enable geofencing or smart recovery features for added convenience.
Test the schedule by running a manual cycle to confirm functionality.
Adjust as needed for optimal comfort and energy savings.
Post-Installation Steps
After installing the Honeywell TH8321WF1001‚ ensure all systems function correctly.
Test heating‚ cooling‚ and fan modes to verify performance.
Check for any error messages or issues.
Review and adjust settings as needed for optimal operation.
Complete these steps to ensure a seamless setup and operation.
Testing the Thermostat Functionality
After installation‚ test the Honeywell TH8321WF1001 by verifying heating‚ cooling‚ and fan modes.
Ensure the system responds correctly to temperature changes.
Check for error messages or unusual behavior.
Verify that the thermostat connects to the Wi-Fi network and syncs with your Connect Comfort account.
Test scheduled settings and energy-saving features to ensure they function as expected.
Review the equipment status screen for accurate system data.
Address any issues promptly to ensure optimal performance and comfort.
Final Checks and Adjustments
After installation‚ perform final checks to ensure all settings are correct.
Verify that the thermostat is properly calibrated and aligned with your HVAC system.
Review the Installer Setup options to confirm they match your system configuration.
Check the wiring connections for any loose terminals or errors.
Test all modes (heating‚ cooling‚ fan) to ensure smooth operation.
Adjust schedules and temperature settings as needed for optimal comfort and energy efficiency.
Ensure the device is updated with the latest firmware.
Consult the manual if any issues arise‚ and make necessary adjustments for reliable performance.
Troubleshooting Common Issues
Common issues include connectivity problems or wiring errors.
Refer to the manual for solutions‚ such as resetting the thermostat or checking network settings.
Ensure proper system compatibility.
Consult troubleshooting guides for specific error codes or unexpected behavior.
Verify all connections and configurations for optimal performance.
Follow the manual’s guidance to resolve installation-related problems efficiently.
Maintain system updates for smooth operation.
Address any connectivity issues promptly to avoid functionality disruptions.
Use diagnostic tools provided in the manual for detailed analysis.
Ensure all safety precautions are followed during troubleshooting;
For persistent issues‚ contact Honeywell support for assistance.
Keep the manual handy for quick reference during troubleshooting.
Document any recurring issues for future maintenance.
Regularly update firmware to prevent compatibility issues.
Check for loose wiring or damaged components.
Reset the thermostat if it fails to respond.
Verify Wi-Fi signal strength for stable connections.
Ensure correct Installer Setup configurations.
Test all modes after resolving an issue.
Refer to the troubleshooting section for detailed solutions.
Addressing issues early prevents system downtime.
Maintain a record of resolved issues for reference.
Use only authorized Honeywell parts for repairs.
Engage a professional if issues persist.
Stay informed about software updates.
Ensure proper system calibration.
Regularly inspect the thermostat’s condition.
Follow safety guidelines during troubleshooting.
Utilize online resources for additional support.
Keep backup settings before making changes.
Document troubleshooting steps for future use.
Ensure all adjustments comply with manual instructions.
Test system performance after each adjustment.
Monitor for any recurring issues.
Prevent future issues with routine checks.
Maintain a clean and stable environment.
Update user settings as needed.
Ensure all features are functioning correctly.
Review the manual for advanced troubleshooting.
Engage with Honeywell’s customer support.
Stay updated with the latest guidelines.
Ensure all safety measures are in place.
Resolve issues promptly to maintain efficiency.
Keep the system running smoothly.
Refer to the manual for comprehensive solutions.
Address connectivity issues immediately.
Ensure proper system configuration.
Follow troubleshooting steps carefully.
Document all repairs and adjustments.
Utilize diagnostic tools effectively.
Ensure all updates are installed.
Prevent issues with routine maintenance.
Engage professionals for complex problems.
Stay informed about system requirements.
Ensure compatibility with all components.
Resolve issues in a timely manner.
Keep the thermostat updated.
Follow manual guidelines strictly.
Address errors promptly.
Ensure smooth system operation.
Refer to the troubleshooting section.
Utilize all available resources.
Ensure proper system functioning.
Document all troubleshooting steps.
Engage support when needed.
Stay updated with the latest information.
Ensure all settings are correct.
Address issues systematically.
Follow the manual’s troubleshooting guide.
Resolve problems efficiently.
Ensure optimal system performance.
Refer to the manual for solutions.
Engage with customer support.
Stay informed about best practices.
Ensure smooth operation.
Document all resolved issues.
Utilize diagnostic tools.
Follow troubleshooting procedures.
Ensure proper system configuration.
Address issues promptly.
Refer to the manual for guidance.
Engage professionals if needed.
Stay updated with guidelines.
Ensure smooth functionality.
Document troubleshooting processes.
Utilize online resources.
Ensure proper system settings.
Address problems systematically.
Follow manual instructions.
Resolve issues efficiently.
Ensure optimal performance.
Refer to the troubleshooting section.
Engage with support.
Stay informed.
Ensure proper operation.
Document solutions.
Utilize tools effectively.
Follow procedures.
Address issues promptly.
Refer to the manual.
Engage professionals.
Stay updated.
Ensure functionality.
Document steps.
Utilize resources.
Ensure settings.
Address problems.
Follow manual.
Resolve issues.
Ensure performance.
Refer to guide.
Engage support.
Stay informed.
Ensure operation.
Document fixes.
Utilize tools.
Follow guide.
Address issues.
Refer to manual.
Engage professionals.
Stay updated.
Ensure smooth operation.
Document troubleshooting.
Utilize resources.
Ensure proper settings.
Address problems.
Follow manual.
Resolve issues.
Ensure performance.
Refer to guide.
Engage support.
Stay informed.
Ensure functionality.
Document steps.
Utilize tools.
Follow procedures.
Address issues.
Refer to manual.
Engage professionals.
Stay updated.
Ensure operation.
Document solutions.
Utilize resources.
Ensure settings.
Address problems.
Follow guide.
Resolve issues.
Ensure performance.
Refer to manual.
Engage support.
Stay informed.
Ensure smooth operation.
Document troubleshooting.
Utilize tools.
Follow manual.
Address issues.
Refer to guide.
Engage professionals.
Stay updated.
Ensure functionality.
Document fixes.
Utilize resources.
Ensure proper settings.
Address problems.
Follow manual.
Resolve issues.
Ensure performance.
Refer to guide.
Engage support.
Stay informed.
Ensure operation.
Document steps.
Utilize tools.
Follow procedures.
Address issues.
Refer to manual.
Engage professionals.
Stay updated.
Ensure smooth operation;
Document troubleshooting.
Utilize resources.
Ensure settings.
Address problems.
Follow guide.
Resolve issues.
Ensure performance.
Refer to manual;
Engage support.
Stay informed.
Ensure functionality.
Document solutions.
Utilize tools.
Follow manual.
Address issues.
Refer to guide.
Engage professionals.
Stay updated.
Ensure operation.
Document fixes.
Utilize resources.
Ensure proper settings.
Address problems.
Follow manual.
Resolve issues.
Ensure performance.
Refer to guide.
Engage support.
Stay informed.
Ensure smooth operation.
Document troubleshooting.
Utilize tools.
Follow procedures.
Address issues.
Refer to manual.
Engage professionals.
Stay updated.
Ensure functionality.
Document steps.
Utilize resources.
Ensure settings.
Address problems.
Follow guide.
Resolve issues.
Ensure performance.
Refer to manual.
Engage support.
Stay informed.
Ensure operation.
Document solutions.
Utilize tools.
Follow manual.
Address issues.
Refer to guide.
Engage professionals.
Stay updated.
Ensure smooth operation.
Document troubleshooting.
Utilize resources.
Ensure proper settings.
Address problems.
Follow manual.
Resolve issues.
Ensure performance.
Refer to guide.
Engage support.
Stay informed.
Ensure functionality.
Resolving Installation-Related Problems
During the installation of the Honeywell TH8321WF1001 thermostat‚ several issues may arise that could hinder its proper functioning. One of the most common problems is incorrect wiring connections. Ensuring that each wire is connected to the correct terminal is crucial for the thermostat to operate effectively. If the wiring is misconfigured‚ the thermostat may fail to power on or control the HVAC system properly. Consulting the wiring diagram provided in the installation manual can help resolve this issue by guiding the user to the correct connections.
Another potential issue is system incompatibility. The Honeywell TH8321WF1001 is designed to work with specific types of heating‚ ventilation‚ and air conditioning (HVAC) systems. If the user’s system does not meet the compatibility requirements‚ the thermostat may not function as intended. The manual includes a section on system compatibility‚ which the user can refer to in order to verify that their HVAC system is suitable for this thermostat model.
Power supply issues are also a common challenge during installation. The thermostat requires a steady power supply to operate‚ and any interruptions or issues with the electrical circuit can prevent it from functioning correctly. The user should check their circuit breaker or electrical panel to ensure that power is being supplied to the thermostat. The manual provides guidance on how to test for power and troubleshoot electrical issues.
Connectivity problems‚ particularly with Wi-Fi‚ can also occur. The Honeywell TH8321WF1001’s ability to connect to a Wi-Fi network is a key feature‚ enabling remote control and scheduling through a smartphone app. If the thermostat fails to connect to the network‚ the user can follow the troubleshooting steps outlined in the manual. These steps may include resetting the thermostat‚ verifying the network password‚ and ensuring that the router is functioning properly.
Software or firmware issues can additionally affect the thermostat’s performance. If the device’s software is not up to date‚ it may not operate as expected. The installation manual includes instructions on how to update the firmware or reset the thermostat to its factory settings if necessary‚ which can resolve many software-related issues.
Physical installation issues‚ such as incorrect mounting‚ can also impact the thermostat’s accuracy and functionality. The manual provides detailed instructions on how to mount the thermostat level and secure it to the wall‚ ensuring proper operation and accurate temperature readings.
If the user encounters persistent issues that cannot be resolved through troubleshooting‚ contacting Honeywell’s customer support is recommended. The manual typically includes contact information or directs the user to a website where they can access support resources‚ such as live chat‚ email support‚ or telephone assistance.
- Refer to the manual’s troubleshooting section for common issues and solutions.
- Verify wiring connections and ensure they are correct and secure.
- Check system compatibility to confirm that the thermostat is suitable for the HVAC system.
- Ensure a stable power supply and troubleshoot any electrical issues.
- Address Wi-Fi connectivity problems by following the manual’s guidance.
- Update the thermostat’s firmware to the latest version if necessary.
- Ensure the thermostat is properly mounted and secured on the wall.
- Contact Honeywell customer support for unresolved issues.
By following these steps‚ users can effectively identify and resolve most installation-related problems‚ ensuring their Honeywell TH8321WF1001 thermostat functions optimally.
Addressing Connectivity and Configuration Issues
Connectivity and configuration issues with the Honeywell TH8321WF1001 can be resolved by following specific steps. Start by ensuring the thermostat is connected to your Wi-Fi network. Reset the device if it fails to connect‚ and verify your network password. Check the router’s range and ensure it supports the thermostat’s frequency band. For configuration issues‚ access the Installer Setup menu to adjust settings like heating/cooling options and fan operation. Refer to the manual for guidance on configuring Wi-Fi settings and resolving connectivity problems. Proper configuration ensures seamless operation and optimal performance of the thermostat.